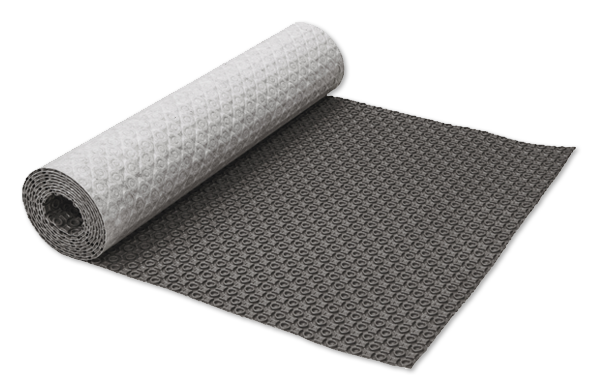


SunTouch HeatMatrix Membrane · 40 sq ft
- CA$122.00
- CA$122.00
- Unit price
- per
Description
xHeatMatrix uncoupling membrane protects your flooring investment!
SunTouch's HeatMatrix allows for faster & easier installation of WarmWire heating cables than ever before, while providing durable, lightweight uncoupling with sheer stress control.
Employing cutting-edge technology, HeatMatrix uncoupling membrane provides a unique control layer between tile and substrate. One-ply, non-woven fleece on the membrane’s underside minimizes the stress caused by lateral, multidirectional movement within the substrate, eliminating a common cause of cracked tiles. HeatMatrix also offers superior point load distribution and remains highly resistant to compression during tile installation.
HeatMatrix is a great choice in concrete applications and where moisture or water vapor is a concern. Polypropylene construction provides a barrier against surface water while deep grooved channels allow evaporation of moisture from below the membrane.
The ultimate in heated tile underlayment flexibility!
HeatMatrix provides adjustable WarmWire spacing to match varying heating requirements. This flexibility makes it easy to adjust the layout so that the wire fits any space perfectly. For most systems, WarmWire is installed at approximately 3-inch spacing.
Instructions
xInstruction manual link:
HeatMatrix Installation Manual
Video:
Install Steps:
Step 1 - Preparation
| Step 2 - Membrane Installation |
|
| HeatMatrix is recommended for use with WarmWire® heating cables. Details about wire, sensor and thermostat placement are included in the WarmWire manual. Read the manual before installing WarmWire. The substrate must be flat, clean, dry, structurally sound, adequately load bearing and free from material which may prevent bonding with the cement mortar. The type of mortar used to secure the membrane to the subfloor depends on the type of substrate. For most substrates, a premium modified thinset mortar is recommended. When selecting mortar for use under the tile, refer to the manufacturers guidelines to ensure the product selected is suitable for use over an uncoupling membrane, and is compatible with the tile selected. | Measure and cut HeatMatrix to the required length for each row. Mark the boundary edge on the subfloor to use as a guide for mortar application. Apply the mortar for the first row using a 1/4" x 1/4" (6.4 x 6.4 mm) notched trowel. Place the cut length of HeatMatrix over the mortar. Position membrane, then readjust alignment if necessary by lifting one end, and pulling lightly. Do not leave gaps between sections of HeatMatrix. Work HeatMatrix in using a float or flat trowel. The entire surface of the fleece on the underside of the membrane should be securely bonded to the mortar. Observe the mortar open time while working. Trim out any rough drain openings or other obstructions if necessary. Repeat the application process for each row until the space to be tiled is completely covered. |
| Step 3 - Heating Cable Installation | Step 4 - Tile Installation | Consult the WarmWire instruction manual before installing wire. Begin by inserting the wire nearest to to the power lead into the membrane channels. (A hand roller or grout float may be used to aid in installation). For the standard heat output, space the wire in rows 3 shapes apart. If the area has high heat loss, heating output can be increased by alternating between 3 and 2 shape spacing. If the area does not require very much heat, output can be lowered by alternating between 3 and 4 shapes. Continue installing until all wire is in place. Do not cut the heating wire if extra is left over after covering the space. Adjust the layout to use up the extra length, or route the wire into areas around the HeatMatrix perimeter if necessary. | After the WarmWire has been tested, the tiles may be laid on top of the HeatMatrix using a thin-bed method. It is advisable to apply the mortar in a single process. Fill voids with flat side of the trowel first, then add a combed layer with the notched side. Ensure 100% coverage while taking precautions to not damage the heating cables. Avoid lining up tile grout lines with the joints between sections of HeatMatrix. Match the notch size of the trowel to the type and size of tile and observe the open time of mortar as per manufacturer specifications. Grout can be applied following the mortar manufacturers recommended wait time. Ensure the mortar is fully cured before operating the heating system. If heat is applied too soon it can interfere with proper curing of the mortar. |
Specification
x| UPC | 840213211011 |
|---|---|
| Thickness | 0.24" |
More Details
x| Brand Name | SunTouch |
|---|

